Friday, 20 December 2013
Sunday, 1 December 2013
Purple Poppies
I've been wanting to experiment further with watercolouring using inks & especially what effects can be achieved using just the one inkpad - in this case Nick Bantock's Damson Plum. Nick Bantock's inkpads are dye based & behave similarly to Distress Inks in that they react with water giving further interesting nuances of colour. Like Distress Inks the effects achieved also vary in accordance with the type of paper they are applied to. The paper I used here - Winsor & Newton Cotman 190gsm Cold Pressed/NOT Grain Fin Watercolour Paper - is one I come back to time & again with these inks for being 190gsm it allows me to fussy cut without wrecking my scissors.
 |
| front of card |
 |
| close-up of water coloured poppy image contrasting with patterned paper |
 |
| Close-up showing gem & sequin butterflies embellishing plus tone-on-tone stamping with patterned paper background |
 |
| close-up showing brad with leaf sequins & ribbon embellishing over tone-on-tone stamped background |
 |
| inside of card showing stamped images & pearlescent matting layer |
The photographs show some of the white or cream areas as tinged with green - especially apparent in my second photograph above: there seems to be some kind of reaction when photographing whites/creams & purples together. I tried various photo editing options to no avail & this is the best I could get it.
The poppies were repeatedly stamped in Nick Bantock Damson Plum & then watercoloured using ink from the same inkpad. Once dry a strip of the images was cut off so as to leave some parts of the flowers & leaves extending outside the cut edge to be fussy cut individually (see above close-up photo of watercoloured poppy).
Supplies
Stamps Chocolate Baroque UDLSP0320 Fresh Florals (poppies on front), UA6SP0272 Abstract Flowers (tone on tone background) & UA4SP0151 Flora & Fauna (inside card).
Inks Nick Bantock Damson Plum (poppies on front & inside, edging purple panel inside card); Dusty Concord Distress Ink (edging patterned paper); Emboss Tinted Stamp Pad (tone on tone background).
Cardstock White plus assorted purples in various finishes from stash.
Paper Winsor & Newton Cotman 190gsm Cold Pressed/NOT Grain Fin Watercolour Paper; Graphicus Guild Membership Pack (patterned paper).
The gems are Anita's whereas the sequins, brad & ribbon are from stash.
I also have a Zentangle post today HERE.
Thursday, 31 October 2013
Commenting Interlude
Thank you everyone for your continued comments, both here & on PEP tangles. Unfortunately I have acquired Painful Arc/Rotator Cuff Syndrome in my left shoulder & coupled with a long standing De Quervain Syndrome in my right thumb I'm having to limit time spent typing. Though I'm hoping to maintain artwork & blog posts I'm going to have to limit commenting in my normal fashion.
Friday, 25 October 2013
Thank You & PEP tangles Post
Thank you for all your kind comments on my previous post - though it's early days with different medication I'm greatly improved.
I have a new post on PEP tangles HERE.
I have a new post on PEP tangles HERE.
Wednesday, 9 October 2013
Perhaps an Interlude.......
Having trouble with migraine medication for the moment.
Out of action for a while.
Tuesday, 1 October 2013
Friday, 27 September 2013
Colour Challenge with Penny Black

 |
| front of card |
 |
| close-up showing fussy cutting detail plus sparkle of glittered flower-centre |
 |
| close-up showing Distress Inks watercolouring |
 |
| inside of card |
 |
| close-up showing tone-on-tone stamping & inked edges of message panel |
The poinsettia images were stamped twice in Distress Ink using the masking technique & watercoloured using a combination of Distress Stain & Marker. These were then cut out & mounted onto the background which had been stamped with the same image. Gold Ice Ice Stickles was mixed with Golden Rod Stickles to create the flower-centre as the Golden Rod by itself proved rather brassy.
Recipe
Stamps Penny Black 40-075 christmas pride (front of card) & 30-057 winter whites & green (message panel images).
Inks VersaFine Onyx Black (tone on tone background) & Vintage Sepia (message panel images); Barn Door Distress Ink & Stain (poinsettia image); Vintage Photo Distress Ink (edging message panel).
Pencils/Markers etc... Barn Door Distress Marker; Ice Stickles Glitter Glue (Gold Ice) & Stickles Glitter Glue (Golden Rod).
Cardstock Winsor & Newton Cotman 190gsm Cold Pressed/NOT Grain Fin Watercolour Paper; white, kraft & brown cardstock from stash.
Tuesday, 10 September 2013
Unplanned Childhood Thoughts
Whilst watering the front garden a few nights ago (we need a lot of rain now after our very dry summer) I noticed the most astonishing sunset as I looked towards the sky over Brecon town. I took some photos & didn't really think more of it. A few days later my husband (observing my honey laden bread for lunch) read me an extract from a Rupert Brooke poem titled 'The Old Vicarage." It wasn't the bit about honey that caught my imagination but the hares at sunset. The image below is the result of my playing about with my photo & graphics editing programme about which I know very little. But there is more - hares led to rabbits & rabbits led to my childhood train journeys to & from school where I'd gleefully count the number of rabbits I could spot in the fields along the railway track. Isn't it strange what the imaginative mind will create if we allow it some freedom?

Midst all the uncertainty of trying to sell our house I'm exploring various aspects of artwork including lettering, journalling & Celtic art. It was on one of those little explorations in blogland that I stumbled upon the Take A Word Challenge where this week's word is Childhood.

Midst all the uncertainty of trying to sell our house I'm exploring various aspects of artwork including lettering, journalling & Celtic art. It was on one of those little explorations in blogland that I stumbled upon the Take A Word Challenge where this week's word is Childhood.
Monday, 2 September 2013
Faber-Castell & Distress Stains


I continue to learn much from various art forms affiliated with stamping, & sometimes from quite unexpected avenues. I was introduced to Alexandra's work when she joined Penny Black as one of their Designers &, although I'm not a scrapbooker, I always learn about some aspect of design, composition or a particular technique through her posts, as indeed I do from the other Penny Black Designers. Alexandra has also been a Guest Designer with Faber-Castell who have put together a prize for one of Alexandra's Followers (details are HERE).
A few months ago I mentioned the problem of mould on my Distress Stains. I was helpfully directed to THIS POST which mentions a similar problem right at the bottom of the post & that the manufacturers will readily replace any affected bottles of Stain. Apparently this was a problem that only affected the first batches of Distress Stains. After removing the mould I dabbed some test samples onto scrap cardstock & now - ten weeks later - there is no sign whatsoever (see photo right) that there has been any contamination of my substrate. I decided not to contact the manufacturer as I understand that the initial manufacturing problems have been resolved & it's really no hardship for me to wipe off any subsequent mould from these particular bottles before I use them for anything.
Sunday, 1 September 2013
Monday, 19 August 2013
Winged Creatures
As long as I can remember my Father never went anywhere without his camera. Lately I've begun to understand as I've delighted in being able to photograph the wildlife in our garden. It was when I first began to craft & was creating in the ATC format that my husband decided that I needed to have a proper camera as my dated non-digital Olympus could not cope with such tiny detail. It took about a year for me to pluck up courage to negotiate the digital technology & I still tend to feel my way forwards using the Macro, SuperMacro & Automatic settings rather than having a theoretical knowledge. The rewards are immense for I have a lot of pleasure in photographing details of plants & insects.
I was dead-heading & weeding the other day when I stumbled upon a moth beautifully camouflaged against the red brown earth. He obligingly allowed me to photograph him as he made his way across one of the Lesser Periwinkle (Vinca Minor Bowles Variety) plants. I believe he is a Large Yellow Underwing Moth for I caught sight of brilliant yellow underwings as he moved.

Our Wallflower (Erysimum "Bowles's Mauve") regularly attracts the Small Tortoiseshell butterfly & yesterday I managed to photograph what I think is a Meadow Brown whilst he was totally engrossed in feeding.

I'm a novice when it comes to identifying butterflies, moths & bees although I've been identifying birds since I was eleven years old. I shall miss the birdlife that we have here in Brecon - suprisingly my last count of positively identified bird species seen in/from our garden came to 27, & that's not including the owl that we regularly hear at night - but I hope that when we relocate to Exeter we'll be able to find a property where I can have a courtyard garden to grow butterfly/bee friendly plants in. Whilst I'm on the subject of insects has anyone else noticed a distinct lack of ladybirds this year? I have only seen one so far.
The house is finally up for sale. Should you know of anyone who loves wildlife & wishes to have a little piece of woodland in their back garden with lovely mountain views........you can point them in THIS direction.
 |
| Red-tailed Bumblebee on Cotoneaster |
 |
| Dandelion Clock in our Woodland |
I was dead-heading & weeding the other day when I stumbled upon a moth beautifully camouflaged against the red brown earth. He obligingly allowed me to photograph him as he made his way across one of the Lesser Periwinkle (Vinca Minor Bowles Variety) plants. I believe he is a Large Yellow Underwing Moth for I caught sight of brilliant yellow underwings as he moved.
 |
| Large Yellow Underwing Moth on Lesser Periwinkle |

Our Wallflower (Erysimum "Bowles's Mauve") regularly attracts the Small Tortoiseshell butterfly & yesterday I managed to photograph what I think is a Meadow Brown whilst he was totally engrossed in feeding.
 |
| Meadow Brown Butterfly on Wallflower |

I'm a novice when it comes to identifying butterflies, moths & bees although I've been identifying birds since I was eleven years old. I shall miss the birdlife that we have here in Brecon - suprisingly my last count of positively identified bird species seen in/from our garden came to 27, & that's not including the owl that we regularly hear at night - but I hope that when we relocate to Exeter we'll be able to find a property where I can have a courtyard garden to grow butterfly/bee friendly plants in. Whilst I'm on the subject of insects has anyone else noticed a distinct lack of ladybirds this year? I have only seen one so far.
The house is finally up for sale. Should you know of anyone who loves wildlife & wishes to have a little piece of woodland in their back garden with lovely mountain views........you can point them in THIS direction.
Monday, 15 July 2013
The Same But Different
I've been struggling to make a card for several days but nothing has been coming together. There are good reasons for this: we are about to have our house valued prior to selling plus my husband had knee surgery in the middle of May which has meant that I've been wearing a lawn maintenance plus woodland management hat as well as being head gardener. Seeing my frustration my husband suggested I make one I'd made previously - I adapted that idea by making a variation of my design HERE using Chocolate Baroque instead of Penny Black stamps.
When I was working with the butterfly I had a vague idea that I'd read somewhere about painting with Liquid Pearls & thought I'd try it (I just diluted a drop with a little water & applied it to the butterfly's wings using a paintbrush). I was quite thrilled with the results & decided to leave the very edges of the butterfly wings plain white so as to provide a touch of contrast without introducing any specific colour to detract from the iridescent shimmer of the Stickles used for the body & wing spots.
Recipe
 |
| front of card |
 |
| close-up showing sentiment panel & tone on tone background stamping |
 |
| close-up showing shine of wet embossing, iridescent glittering, pearlescent & matt white contrasts plus shaped dimension of butterfly |
 |
| inside of card |
 |
| close-up of corner stamping |
When I was working with the butterfly I had a vague idea that I'd read somewhere about painting with Liquid Pearls & thought I'd try it (I just diluted a drop with a little water & applied it to the butterfly's wings using a paintbrush). I was quite thrilled with the results & decided to leave the very edges of the butterfly wings plain white so as to provide a touch of contrast without introducing any specific colour to detract from the iridescent shimmer of the Stickles used for the body & wing spots.
Recipe
Stamps Chocolate Baroque UDLSP0153 Just Butterflies (butterfly), UDLSP0155 Delightful Damask (sentiment) & UA4SP0146 Big Flowers (background & inside of card).
Inks Fired Brick Distress Ink (background), VersaFine Onyx Black (sentiment), VersaFine Onyx Black with Stewart Gill Ultrafine Embossing Powder (butterfly), VersaFine Satin Red (inside of card).
Pencils/Markers etc… Memento Tuxedo Black Dual Marker (edging cardstock), Crystal Ice Stickles Glitter Glue, White Opal Liquid Pearls (colouring butterfly wings).
Cardstock Whites & assorted blacks in various finishes from stash.
Paper Textured red from stash.
Dies Spellbinders Nestabilties Labels 16 (sentiment), Sizzix Bigz Die – Elegant Flourishes (swirls).
The pearls are Papermania.
Thursday, 27 June 2013
Peacock Mandala
I had actually intended to use several more elements from Glenda's recent release of peacock stamps but eventually the mandala looked right using only two of the stamps - repeating the same image but in different sizes. This is a feature that I really appreciate with Chocolate Baroque: the provision of the same image but varying the direction it faces &/or the sizing.
The two stylised feathers were repeatedly stamped & cut out after colouring & then gently shaped prior to assembling them in a mandala pattern.
 |
| front of card |
 |
| angled view to show glittering & central patterning |
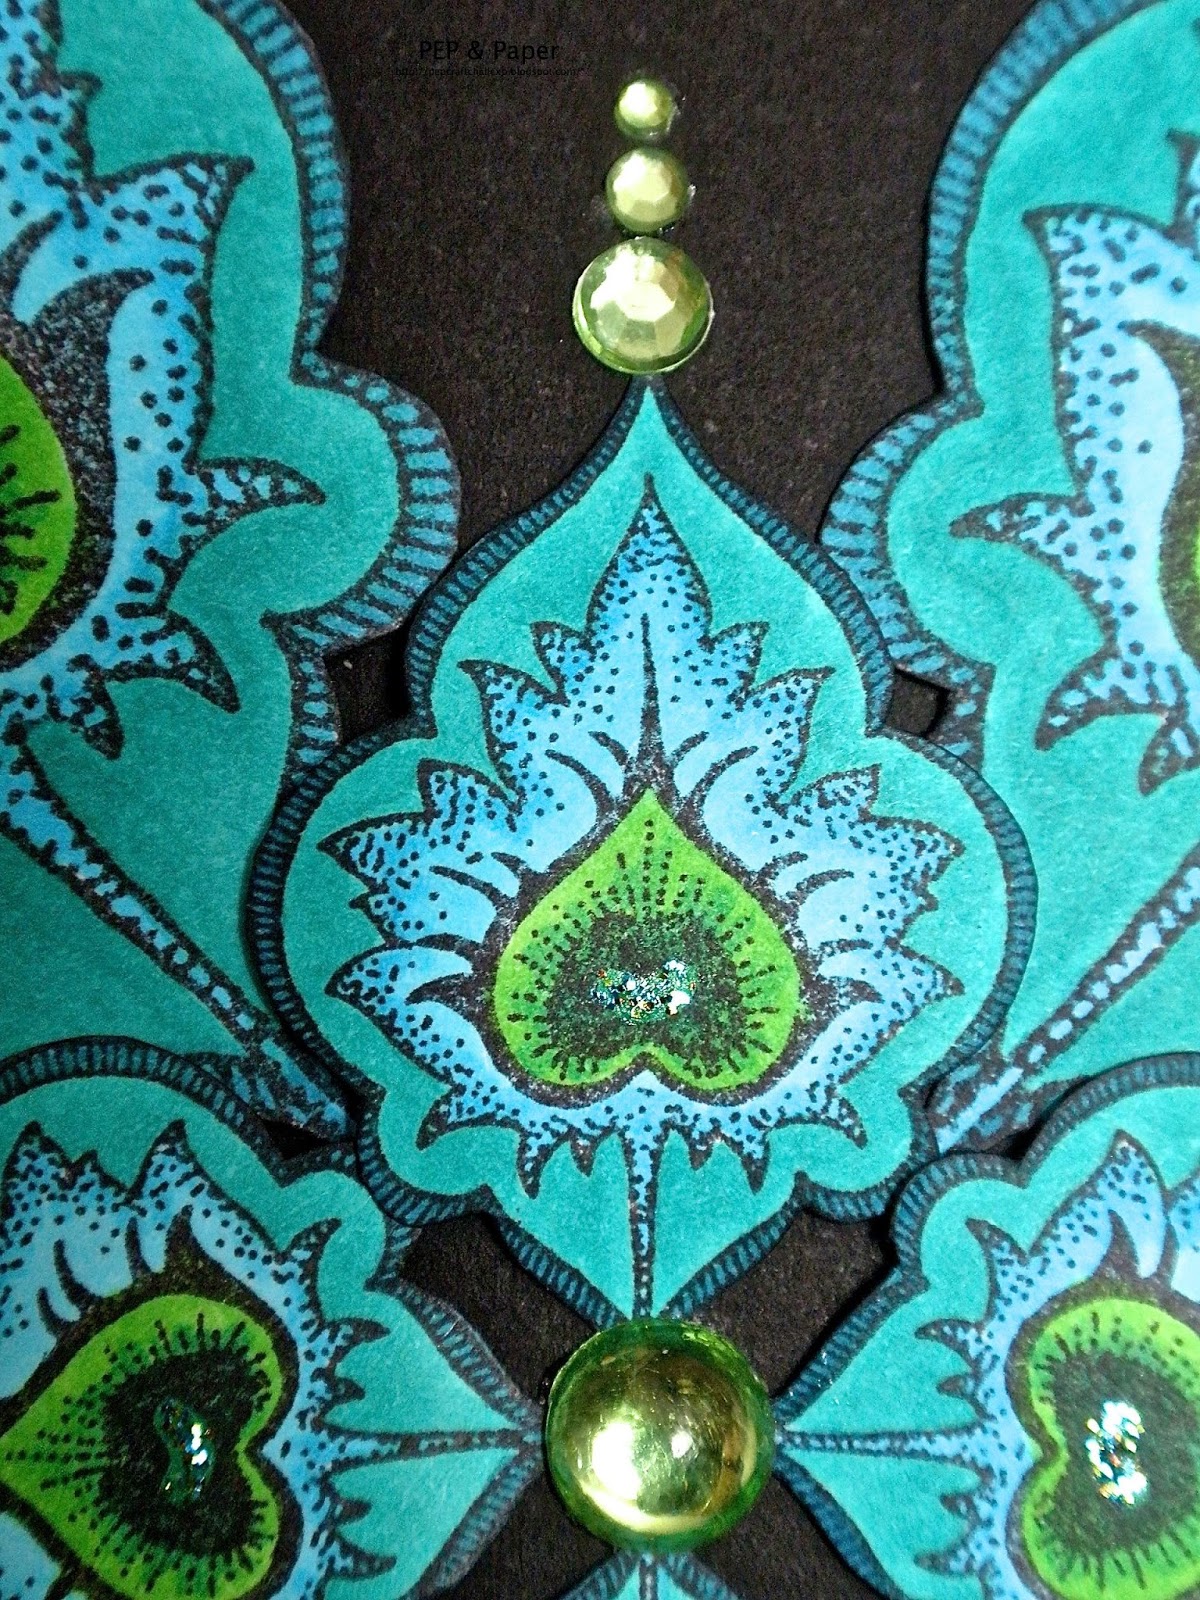 |
| close-up showing detail of colouring plus embellishing |
 |
| angled view to show dimensional shaping & layering |
 |
| inside of card |
The two stylised feathers were repeatedly stamped & cut out after colouring & then gently shaped prior to assembling them in a mandala pattern.
Recipe
Stamps Chocolate Baroque UA4SP0419 Peacock Parade.
Stamps Chocolate Baroque UA4SP0419 Peacock Parade.
Inks Memento Tuxedo Black (images on card front), Memories Black Dye (inside of card & edging paper).
Pencils/Markers etc… Copic Markers, Memento Tuxedo Black Dual Marker; Stickles Glitter Glue (Patina).
Pencils/Markers etc… Copic Markers, Memento Tuxedo Black Dual Marker; Stickles Glitter Glue (Patina).
Cardstock Blacks in various finishes from stash.
Paper Textured light blue from stash.
Punches Woodware (Corner Rounder & Inverted Corner).
The gems are an assortment from stash including Kanban & Anita's.
Paper Textured light blue from stash.
Punches Woodware (Corner Rounder & Inverted Corner).
The gems are an assortment from stash including Kanban & Anita's.
Friday, 21 June 2013
Distress Stain Cultures

A quick question: the above photo shows some of my Distress Stains - I have the 36 basic colours plus Picket Fence - which seem to have acquired some interesting cultures which don't smell but I'm not quite sure how to deal with. I was about to take the whole set of 37 & just dispose of them & put Distress Stains & me down to not being compatible - but I wondered if there was some mileage in taking the tops off & whether the stains themselves would be usable in just spray form or I could use them for watercolouring with. I suppose the question really is whether the mould is inherent in the stains or it is just the gauze top that has somehow gone mouldy. My craft room is not damp & we have more than adequate heating.
I would appreciate any ideas or suggestions. I have had the stains for over a year so I'm not considering returning them or asking for a refund & as I prefer the inkpads themselves I'm not looking to replace them. I just don't want to use them for water colouring & thereby 'contaminate' any artwork only to find that my artwork goes mouldy.
Saturday, 8 June 2013
Wednesday, 29 May 2013

Friday, 12 April 2013
Woodland Management Part 2
Thank you for all your kind comments on my last post - I'd not realized it would create so much interest.
 |
| the plateau at the top of our first bank leading up to the second bank's steps & the perimeter fence |
In my previous post I briefly mentioned the birdlife we have in our garden. We often hear an owl & even a few Mallard ducks have been known to find their way (a considerable detour from the Brecon Canal) onto our lawn. Treecreepers & Nuthatches are regular visitors as are Wrens & Titmice (Great, Blue, Coal & Longtailed). Often a Robin will come to see what we're doing & during the hard winters the Blackbirds will come & wait expectantly for food which we put out. I've also glimpsed a Greater Spotted Woodpecker & the odd Goldfinch. Various members of the Crow family, including Jays, are also in evidence. An intriguing feature we discovered just at the top of the steps (where the ground starts to level into a small plateau) is an 'anvil' stone which some of the birds use to crack open snail shells - we've seen them do this on our stone terracing.
 |
| the 'anvil' stone with the tell-tale snail shell remains to the right (about half way between the stone & the photo's edge - click to enlarge) |
 |
| close-up of the snail shell remains |
The hand rail was in a rather sorry state but my husband managed to find the various parts of it scattered amongst the brambles. After reassembling, sanding & treating with preservative plus wood stain it now provides something very solid to grasp whilst ascending the bank approaching our steps leading up to the gate & perimeter fence.
 |
| the approach to the perimeter fence - this was taken prior to staining the rail & before we'd started repairing the steps |
 |
| the hand rail after painting with wood stain |
We didn't have to replace all of the uprights or posts but those that were sound we stabilized & treated with wood preservative plus wood stain. We also built up the earth so as to make the 'treads' more solid.


Wednesday, 10 April 2013
Woodland Management Part 1


The photo on the left was taken with my back towards our perimeter fence looking down onto the bungalow. I reversed the positions & took the photo to the right with my back against the window visible in the first photo looking up over 3 tiers of terracing into the woodland where I was standing for the first photo.
During some earlier dry & snow-free weather my husband managed to clear all the brambles etc... which had grown over the handrail & wooden steps leading up to the gate. The steps & the rail itself were in need of repair so that is what we have been working on now that the snow has thawed. We started with the steps leading into the woodland from the lawn but had to evict a couple of dozen lodgers who had made nests between the bank & rotting wood.
WARNING
THE FOLLOWING SMALL PHOTOS SHOULD ONLY BE ENLARGED IF YOU ARE USED TO DEALING WITH GARDEN CREATURES
 |
| one of the rotten wood uprights removed |


to the left is the sight that met us as we removed the wooden upright & to the right is a close-up of some of the inhabitants
 |
| a new upright cut, sealed with preservative & screwed into posts dug in at either side AFTER evicting the slugs |
 |
| the completed steps after painting with wood stain |
In my next post I'll show some photos taken after we'd finished repairing the top section of steps leading to our gate which opens onto the Public Footpath.
Tuesday, 26 March 2013
Fluttering Flourishes
Brenda (Floral Fantasies) is hosting a blogaversary & 4,000 follower special celebration challenge based upon something in connexion with her artwork/blog (for full details see Brenda's post).
It was sometime in the early part of 2011 that I began to visit Brenda's blog - at about the same time as I was becoming more interested in the Penny Black stamp company. Since then I've learnt much from her artwork & so it wasn't difficult to think of a number of things when pondering over my submission for her challenge.
I have CASEd the first card in Brenda's post Cherish & Dream in such a way as to demonstrate what I see in Brenda's artwork. A particular feature of her work is the matting of the main panel - there are usually two borders; the outer one thicker than the inner. Flowers & butterflies are common components as are die-cuts, swirls & pearls. More often than not there is some kind of stamping & inking (frequently with Distress Inks) combined with dimension in the form of shaped flowers or decoupage.
 Brenda & I share a fondness for Penny Black stamps & so I used these for all the stamped elements. She often creates an inky background or a scene but after my husband caught me 'red-handed' (his words) I abandoned my attempts & created a floral background using my favoured technique of tone on tone stamping.
Recipe
It was sometime in the early part of 2011 that I began to visit Brenda's blog - at about the same time as I was becoming more interested in the Penny Black stamp company. Since then I've learnt much from her artwork & so it wasn't difficult to think of a number of things when pondering over my submission for her challenge.
I have CASEd the first card in Brenda's post Cherish & Dream in such a way as to demonstrate what I see in Brenda's artwork. A particular feature of her work is the matting of the main panel - there are usually two borders; the outer one thicker than the inner. Flowers & butterflies are common components as are die-cuts, swirls & pearls. More often than not there is some kind of stamping & inking (frequently with Distress Inks) combined with dimension in the form of shaped flowers or decoupage.
 |
| front of card |
 |
| close-up showing shine of wet embossing plus shaped dimension of butterfly |
 |
| close-up of background tone on tone stamping upon linen textured paper prior to card assembly |
 |
| inside of card |
 Brenda & I share a fondness for Penny Black stamps & so I used these for all the stamped elements. She often creates an inky background or a scene but after my husband caught me 'red-handed' (his words) I abandoned my attempts & created a floral background using my favoured technique of tone on tone stamping.
Recipe
Stamps Penny Black 30-117 free flight (butterfly & sentiment), 4159K
sundial (background & inside of card).
Inks Fired Brick Distress Ink (background), VersaFine Onyx Black (sentiment), VersaFine Onyx Black with Stewart Gill
Ultrafine Embossing Powder (butterfly), VersaFine Satin Red (inside of card).
Pencils/Markers etc… Memento Tuxedo Black Dual Marker (edging cardstock
& sentiment border).
Cardstock Whites & assorted blacks in various finishes from stash.
Paper Textured red from stash.
Dies Spellbinders Nestabilties Labels 17 (sentiment), Sizzix Bigz Die –
Elegant Flourishes (swirls).
The pearls are Papermania.
Subscribe to:
Posts (Atom)