PEP tangles - my Zentangle Inspired Art blog

Monday 29 November 2010

My Creative Classroom - Terriffic Techniques Wk 3

The subject for the third week of techniques was Stampbord - I worked with the domino sized pieces I had so adapted the exercises to suit.

The first example can be used to make a Christmas Badge (in which case it needs a pin attaching to the back) or as a sentiment on a card or tag. I did not have a sufficient number of tiny gems for the berries so improvised by using a combination of Glossy Accents & Stickles Glitter Glue. The edges were sanded & then the sides coloured with a Sakura Stardust Pen (the dimension of the berries & sparkle of the sides becomes more apparent by clicking the photo to enlarge).

Stamp: Hobby Art
Inks: Distress Inks (Chipped Sapphire, Tumbled Glass), Memento (Tuxedo Black)
Colouring: Copics, Stickles Glitter Glue (Xmas Red), Sakura Stardust Pen


With the second example I have used the scratcing tool to etch away the areas inside the wings of the stamped image. This time I went round the edges & the sides with a Sakura Stardust Pen.

Stamp: Elusive Images
Inks: Distress Inks (Crushed Olive, Forest Moss, Peeled Paint), Memento (Tuxedo Black)  

angled view showing edging & sides coloured with Sakura Stardust Pen

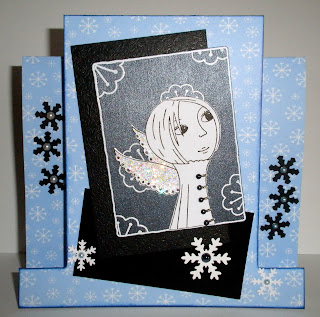
Black & White Steps Into Blue With Snow


card standing showing glittered wings
& black Moondust image panel

angled photograph in brilliant sunshine to show
 differences of the various black layers

 close-ups showing pearl embellishments on snowflakes & coat fastening
plus the different finishes of Moondust, textured & glossy black cardstocks

 inside of card
(click on images to enlarge)

The Sugar Bowl Challenge 48 is a sketch by Marlene with the optional theme of "Black, white AND..." (in my case blue) whilst the All Things Sugar Nellie Forum Challenge this week is to make any type of stepper card (I've made a Fancy Fold Stepper based on this tutorial). It was whilst working on the Stepper Card that I realised that I astonishingly also had the bones of the sketch – with a little bit of tweaking (turning the sketch 90 degrees clockwise).

ETA I'd forgotten about describing my image panel. The image was stamped & heat embossed in white onto the Moondust black cardstock. A second image was stamped in black ink onto white cardstock & only the figure cut out & glued in place over the main image panel - really paper piecing the figure with white cardstock. 

Recipe
Stamps Sugar Nellie Leanne Ellis Dreamer (image), Penny Black Giving & Receiving (snowflake).
Inks etc… VersaFine (Onyx Black & Majestic Blue), VersaMark watermark stamp pad & Stampendous Detail White Embossing Powder.
Colouring Stickles Glitter Glue (Ice Stickles Crystal Ice), Sakura Stardust Pen, Inkssentials White Opaque Pen.
Cardstock Black, Moondust black, glossy black, textured black, white, & snowflake patterned blue from “stash”.
Punches, Dies etc… Woodware (large white & small black snowflakes, Dovecraft (small white snowflakes), Spellbinders Nestabilities (Large Deckled Rectangles).
Pearls The black are Papermania, the pale blue & the white from "stash".

Challenges Entered
The Sugar Bowl Challenge 48 - Marlene's sketch + theme: Black, white AND..... (see above)
Simon Says......... Let It Snow!!(I think all my snowflakes qualify for this one)
Stamp &  Create Challenge 7 - Tis the Season

Saturday 27 November 2010

Icing On The Cake

I thought I'd take some photos this morning as we had our first snowfall yesterday. It is very pretty but not to be ventured out into - even the most agile of people can find themselves sitting down rather nastily as an icy patch catches you unawares.

view from our bedroom over Brecon town towards the next valley

some pretty berries outside our kitchen window

our woodland viewed from my craft room

.....and the birdbath which looks like an iced cake


Thursday 25 November 2010

Terrific Techniques Wk 2 Masquerades as a Waltzing Mouse Sketch

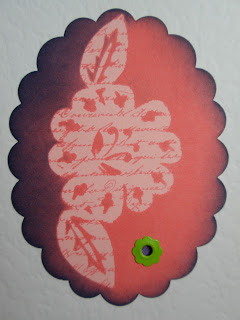
I had actually decided that I didn’t have time to make a card for the Waltzing Mouse Sketch Challenge as I still have three weeks of the My Creative Classroom exercises to complete before next Thursday (when the lessons are no longer "live"). However, I've been experimenting with my new Tim Holtz Mask which arrived yesterday &, as I was embellishing & mounting my completed exercises, I remembered a piece of lime green spotted ribbon & the Waltzing Mouse Sketch. So..... I thought a little….. & a few hours later…. after fiddling a little (with a few punches, the Cuttlebug, ribbon, pearls, inks...... OK I admit after quite a bit of fiddling, including rotating the sketch 90 degrees clockwise & thinking my way around embossing the cardstock so as to cover an area larger than would fit through the Cuttlebug in one go).

front of card

close-up of masked panel showing script stamping

close-up showing dry embossing &
 pearl embellishment

inside of card showing paper piercing
of scalloped rectangle
(click on image to enlarge)


Recipe
Stamp Crafty Individuals CI-017 (script).
Inks etc… Distress Inks (Worn Lipstick & Chipped Sapphire) for masked script panel; VersaMagic (Key Lime & Pretty Petunia) for inking various cardstock edges.
Cardstock An assortment of white, lilac, pink & green in various textures & finishes from “stash”.
Punches, Dies etc… Woodware (Oval & Scalloped Oval, Scalloped Rectangle), Cuttlebug Embossing Folder (Floral Fantasy). Tim Holtz Ideology Mini Mask (Floret)
Pearls Papermania.
The ribbon & eyelet are from “stash”.

Challenge Entered
Waltzing Mouse Sketch Challenge 24 - WMSC24 (see above)


And finally my other completed exercise for the second week of Terrific Techniques

Layered Colouring Masking
Stamp: Crafty Individuals
Inks: Distress Inks (Broken China, Chipped Sapphire, Faded Jeans, Tumbled Glass)

Wednesday 24 November 2010

My Creative Classroom - Terriffic Techniques Wk 2

The topic for the second week was "Masking & Layering". I had thought a mask was the same as a stencil but soon discovered that it is in fact the exact reverse of a stencil. In the first three examples below I have used peel off stickers (Santa's sleigh, stars, & hexagons) as masks so that I could get on with the exercises. These proved somewhat sticky despite my fingering the backs before positioning them & so I lost several backgrounds through the paper tearing.

Masking Stamped Images
Stamps: PaperArtsy
Inks: VersaFine (Onyx Black), Distress Inks (Black Soot, Chipped Sapphire)
Colouring: Faber-Castell Polychromos & Derwent Coloursoft with Sansador

Masked Background
Inks: VersaMagic (Aegean Blue, Night Sky, Sea Breeze)

Variation of Stamping with Masked Background
Stamps: Elusive Images
Inks: VersaFine (Majestic Blue), Distress Inks (Stormy Sky, Tumbled Glass, Weathered Wood)

Masked Fairy with Layered Landscape
Stamps: Elusive Images
Inks etc: VersaFine (Imperial Purple, Olympia Green, Onyx Black, Satin Red), Nick Bantock (Sapmoss Green), 
Distress Inks (Bundled Sage, Crushed Olive, Forest Moss, Peeled Paint, Pine Needles, Tumbled Glass),
Stewart Gill Ultrafine Embossing Powder for blossoms

angled photograph showing Ice Stickles Crystal Ice Glitter Glue used on wings

Layered Landscape - Late Autumn/Winter
Stamps: Elusive Images
Inks: VersaFine (Olympia Green), Distress Inks ( Bundled Sage, Crushed Olive, Forest Moss, Peeled Paint, Pine Needles, Shabby Shutters, Weathered Wood)
Colouring: Faber-Castell Polychromos with Sansador for pine cones


Sunday 21 November 2010

Tent Card With Poise & Joseph's Coat

There were quite a few hurdles in the making of this, any one of which would have prevented my posting the completed card, & I'm still a little unsure of the finished article.

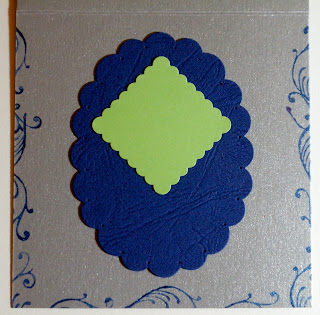
Initially I used Distress Inks to cover the brayered base card after heat embossing the stamped image (Joseph's Coat Technique) but they were not strong enough to cover the bright greens, so I tried Brilliance Starlite Black, that didn't work either. Thinking logically: if the brayering onto glossy card was with dye inks, the Distress Inks (dye, but with their own unique properties) were not dense enough & the Brilliance (pigment) which normally copes with most surfaces wasn't great, might a "normal" dye ink work? I tried the All Night Media Dye in black - several hours later it was still rubbing off onto my fingers. Knowing that I might wreck my heat embossed image completely in the process, I used my heat gun briefly to heat set the black ink. It worked. The final hurdle was photographing the Mirri card!

card standing

close-up of image showing Joseph's Coat Technique,
 lime Mirri card & texture of blue cardstock

inside of card showing texture & paper piercing 
on blue cardstock plus stamped swirl edging
(click on image to enlarge)

Recipe
Stamps Sugar Nellie Leanne Ellis Poise (image), Elusive Images UDLSP0220 Dawn Chorus (swirls). 
Inks Kaleidacolor Caribbean Sea, Chipped Sapphire & Black Soot Distress Inks (see above), Brilliance Starlite Black (see above), All Night Media (Black), VersaMark watermark ink pad & Stewart Gill Ultrafine Embossing Powder, VersaFine Majestic Blue (swirls).
Cardstock  Moondust Silver,  textured blue,  lime Mirri & pale green from "stash".
Punches, Dies etc...  Woodware (Scalloped Circle, Scalloped Oval & Scalloped Square).
Pearls Kanban.
Ribbon from "stash".

Challenges Entered
Crafty Creations Challenge 94 - Beautiful Insides

Friday 19 November 2010

My Creative Classroom - Terrific Techniques Wk 1

Click on images to enlarge

Embossed Resist
Stamp: Elusive Images
Inks: as listed

Embossed Resist project
 see HERE for details


Joseph's Coat
Stamp: Elusive Images
Inks: Kaleidacolor Pastel, Distress Ink (Chipped Sapphire)
Inked heat embossing over brayered background


Faux Batik
Stamps: Elusive Images
Inks etc: Distress Inks (Bundled Sage, Crushed Olive, Rusty Hinge, Wild Honey) for background;
 VersaFine Vinage Sepia & Stampendous Detail Black Embossing Powder for text

Stamps: Elusive Images
Inks etc: blues & violets from ColorBox PetalPoint (Pinwheel) for background;
VersaMark & Stampendous Cobalt Blue Embossing Powder for text


White Resist
Stamp: Elusive Images
Inks: as listed

White Resist Project
see HERE for details

With the tree Faux Batik exercise I had intended to stamp the text in VersaFine Vintage Sepia but it was too indistinct so whilst the ink was still wet I quickly sprinkled it with Detail Black Embossing Powder & heat embossed it. Had the text not been a requirement of this exercise I would not have chosen to stamp the text over the tree. Personally this is what I am finding so useful about a structured course - I am doing things that I would otherwise not try & learning to think round problems as I become more familiar with both techniques & materials. 

Thursday 18 November 2010

A Twist of White Resist Waltzes With Sparkle

front of card

close-up of image photographed at an angle to show
sparkle of coloured scrollwork & necklace plus heat embossing

close-up showing White Resist detail

inside of card showing stamped edges & chandelier
corner plus texture of message panel

I can't remember whether it was the corner stamp that suggested the Waltzing Mouse Sketch Challenge or the sketch that suggested the stamp, however, I think these were made for each other. This particular Challenge coincided with my getting to the first week of the second set of MCC coursework (I'm still catching up, & - although it means the coursework takes longer - I like the fact that I see ways in which to incorporate the new techniques for Challenge projects). I tweaked the background White Resist technique somewhat: after I'd used Distress Ink to cover my white stamping of the chandelier & had  lightly rubbed off the excess I gently dabbed the whole with a wet wipe - that softened & blended the red a little. It was one of those "on the spur of the moment" actions that worked, often they don't & end up in the bin.

Recipe
Stamps Elusive Images UA5SP0340 Belle of the Ball.
Inks etc... ColorBox (Frost White), Brilliance (Graphite Black), Barn Door Distress Ink, VersaMark watermark stamp pad & Stampendous Detail Black Embossing Powder.
Colouring Sakura Stardust Pens.
Cardstock Black, textured white, & Moondust silver from "stash".
Punches Woodware (Circle & Scalloped Circle).
The bradgems & ribbon are all from "stash".

Challenges Entered
Waltzing Mouse Sketch Challenge 23 - WMSC23 (see above)
Simon Says Stamp - Sparkle with optional extras (I used the optional extra of heat embossing for the stamped corner image; both the black embossing & the Sakura Stardust colouring of the scrollwork sparkle as does the silver Moondust cardstock used for the inside)

Sunday 14 November 2010

Tealight Candle & Internal CAS Firsts

The All Things Sugar Nellie Forum Challenge this week is to make a Tealight Candle Card. I have never made one of these before & went in search of a tutorial in imperial measurements as the US members of the forum - who work in inches - had requested this rather than the centimetres that the European contingent utilize. I tend to work in either - though I calculate layering measurements more swiftly in metric. I used the imperial measurements from this tutorial to construct my card. The holographic Mirri card made photography extremely difficult as did the shiny nature of the gift wrapping ribbon. Another first was my stamping the sentiment directly onto the card base. For the internal decoration I tried using punched panels in my normal fashion & also covering the white cardstock with patterned paper; I even considered stamping a candle image in place of the punched snowflakes but whatever I did just looked "fussy". Eventually I settled upon this "less is more" approach".


front of tealight candle card, the snowman pattern
 of the base cardstock is just visible

close-up of image panel showing dry embossing
of holographic gunmetal Mirri card

inside of card showing sentiment &
layered snowflakes

close-up of sentiment

close-up of layered snowflakes

Recipe
Stamps Sugar Nellie Elisabeth Bell Partridge in a Pear Tree (image), Elusive Images UDLSP0335 Light of Christmas (sentiment).
Inks Versafine Onyx Black.
Colouring Derwent Coloursoft Pencils, Paper Stumps & Sansador plus Sakura Stardust Pens for bracelet & ornament (image); Whispers Strokes Marker (sentiment).
Cardstock Snowman patterned, Holograhic gunmetal Mirri, light & dark blue from "stash".
Punches, Dies etc... Woodward (scallpoped oval, snowflakes), Cuttlebug Embossing Folder (Swiss Dots).
The gift wrapping ribbon & star sequins (on snowflakes) are from "stash".


Challenges Entered
All Things Sugar Nellie (Paper Craft Planet) Wk 29 - Tealight Candle Card
Lili of the Valley Challenge 73 - Anything Goes (normally I would use a LOTV image but LOTV specify that "for ONE WEEK ONLY you can use ANY MAKE OF STAMP OR DIGI IMAGE")

Friday 12 November 2010

My Creative Classroom - Rubber Stamping Back to Basics Wk 5 (Final Project)

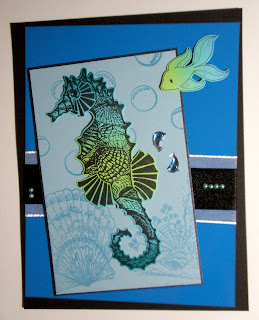
The final "homework" of the course is to use any of the techniques covered in a project based upon one of 5 sketches provided by Glenda. Since the sketch forms part of the Copyrighted Course Material I have not included it in this post. I used brayering for the seahorse & fish plus heat embossing for the seashell, seaweed & bubbles.


Prior to working through the course I neither knew what to use them for nor was I confident in stamping silhouette stamps. The seahorse is my first ever stamping of this particular stamp - I could hardly believe when it turned out so well.

Recipe
Stamps Elusive Images UA5SP0259 Underwater (seahorse, seashell & seaweed),  CC Designs Sugar Plums Underwater (bubbles & fish).
Inks etc... Memento Tuxedo Black & Kaleidacolor Caribbean Sea (seahorse & fish), VersaMark watermark stamp pad & Stewart Gill Ultrafine Embossing Powder (seashell, seaweed & bubbles). Stormy Sky Distress Ink for inking cut edges of the glossy royal blue cardstock.
Cardstock Black, Moondust Black, Glossy Royal Blue & Pale Blue from "stash".
The dolphin gems, ribbons & pearls are all from "stash".

Thursday 11 November 2010

My Creative Classroom - Rubber Stamping Back to Basics Wk 5

Brayer Tricks
Stamp: Elusive Images
Inks: Kaleidacolor Caribbean Sea, Memento Tuxedo Black

Reflection
Stamps: Elusive Images
Inks: Kaleidacolor Caribbean Sea, Memento Tuxedo Blacck

Wednesday 10 November 2010

AWARD


My fellow student from the MCC course, Deborah, has given me the above. So - it seems that to go with the flow - I should tell you 3 things about myself that make me different.

i) I cause havoc with computer purchases - don't take me shopping with you, as you're likely to come home with a faulty machine. So far I have managed to purchase the following faulty from new items: 1 Dell printer, 1 MacBook Pro Laptop, 2 Epson Printers. 3 of those were within the last few months!

ii) English is not my first language though it is the one I am most comfortable using. I normally create havoc (again) with idioms - I lead people up the wrong tree frequently, not to mention those I have then also sent barking up the garden path.

iii) If there are several ways of doing something I will automatically choose the hardest or the most long-winded method.

I'm supposed to pass this on to 5 others - so if you'd like it then I suggest you take it from me as I really don't know who to choose.

My Creative Classrooom - Rubber Stamping Back to Basics Wk 4 (part ii)

Neither of these two projects for homework were very easy for me - I'm a perfectionist & like to understand what I am doing - if it doesn't work, then I'll do it again & again until someone shows me or I find out for myself what I am doing wrong.  I still cannot quite explain why these were so hard but it took a long time for me to get the hang of blending the colours without pools of water or the resulting blend being the same all over instead of a gradation of blend.

The background to my Watercolour Pencils project was made by misting a repeatedly stamped image using an assortment of Whispers Strokes Markers with the Direct to Rubber Technique.

Watercolour Pencils
Stamps: Elusive Images
Medium: Daler-Rowney Artists' Watercolour Pencils

Mica Watercolours
Stamp: Hobby Art
Medium: Twinkling H20s