PEP tangles - my Zentangle Inspired Art blog
Showing posts with label Tutorial. Show all posts

Friday, 16 December 2011

Tying A Patterned Ribbon Bow Right Side Up

The main inspiration for what follows is a video tutorial by Becca Feeken of Amazing Paper Grace where she explains how to tie peg bows. I like to have my ribbon tails both exiting the bow from behind & showing the right side (as Becca does), moreover with a patterned ribbon having an up or down motif (as in my example where the flower stems grow up out of the ground) I don't want any part of the bow looking as if it is upside down. Not always having pegs to hand I thought I would see if it was possible to do something similar using my fingers & the following is what resulted.


1) Using a piece of ribbon about 12 inches long


2) & placing the bottom edge of patterning to the left, loop the ribbon around the first two fingers as shown.


3) Taking the left tail place it over the right ribbon & flip over between the first two fingers.


4) Turn the hand over & ensure the right side of the ribbon you have just flipped over is facing you & the bottom edge of the pattern is to the left.


5) Insert the tail down through the gap between the two fingers as shown.


6) Turn the hand back so the palm faces you & the ribbon just inserted through the gap has the wrong side facing you.


7) Pull the top tail straight down so the wrong side faces you & the tail is towards the right of the first  tail as shown.


8) Taking the left tail fold it up & over the second tail as shown.


9) Insert the tail through the loop formed by the second tail as shown.


10) Pull the first tail upwards & the second tail downwards ensuring both the tails have their wrong sides facing you.


11) Pull tight


12) Turn the hand over & neaten the centre fold if necessary.


13) Turning the hand back so that the palm faces you the knot should look like this with an inverted U or horseshoe shape visible.


14) The tails can be pulled downwards......


15) ....... or sideways


16) ......& the ends snipped as desired.
Here you can see that both bows have the flowers growing upwards out of the ground whether looking at the bows themselves or the tails.

Tuesday, 8 February 2011

Stepper Tutorial

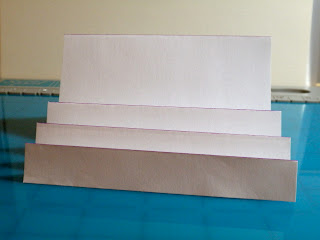
I could not find a Stepper tutorial that would give me 3 steps & then a back panel, moreover I didn't wish to use a piece of 12 x 12 cardstock as I don't have any & I DO have a massive selection of A4. So, this is what I came up with for last Sunday's card.

I haven't tackled any computer graphics yet so my diagrams are hand-drawn but you can click on the images to enlarge & hopefully in conjunction with the photos they will make sense. If you have any questions please just ask. I find it useful to initially make up anything new or unusual using ordinary copier paper, which is what I have used in the photos below.

1. Cut a piece of cardstock to 5 x 11½ inches.

2. With the short side to the left score vertically at ¾, 1½, 2½, 3½, 4¾, 6 & 8¾ inches.


3. Mountain fold the unbroken lines (at ¾, 2½, 4¾, & 8¾ inches).
    Valley fold the broken lines (at 1½, 3½ & 6 inches).


4. This is the basic frame which can then be decorated as desired. 

5. The 5 inch measurement can easily be adjusted as I did with mine to accommodate exactly 5 hearts so
    my width was 4 & thirteen sixteenths of an inch. The back panel I decorated & secured to the last
    step was this width & 5 inches in height.


I was mid-project on Sunday when my husband brought me a mug of coffee - confronted by the chaos on my bench he suggested I take a photo & post it on my blog, so ...........

Tuesday, 7 September 2010

Top Tip Tuesday #1

One of the constant problems when crafting is that of the clogged Stickles or Glossy Accents bottle (even if a bottle is used daily it just waits to splurt all over your project if you dare to miss checking it prior to an application). My tool for doing this is a cotton  bud with a blunt needle glued into the cotton wool bud at one end (I found Glossy Accents provided a sufficiently strong bond). 

If you poke this into the clogged tip, twiddle it a little & gently pull it out again the little plug of congealed glue will often have attached itself to the needle's point - this can then be wiped off with a tissue.

At the opposite end I cut off the cotton wool bud so that I could use the same gadget for twirling the green stalks of bought floral embellishments (whilst being mindful of the needle).

This is the tip I am entering into Top Tip #1 on the new Top Tip Tuesday blog.