PEP tangles - my Zentangle Inspired Art blog
Showing posts with label MCC Terrific Techniques. Show all posts

Sunday, 5 December 2010

My Creative Classroom - Terriffic Techniques Wk 5

The final set of “homework” for My Creative Classroom – Terrific Techniques (with the theme of texture) proved to be somewhat of an eye-opener. I wasn’t going to do the Funky Foam exercise as I’ve tried this once before & didn’t like it at all. However, that was almost two years ago, & experience has taught me that  I sometimes have to rethink an attitude. I managed to find some craft foam available to purchase in single sheets though the cleanest piece (I don’t think this stock sells very fast) was pink! Suffice to say that I loved the Funky Foam – I wonder if Santa might bring me the pack  of foam I’ve seen in WH Smith’s which contains a whole rainbow of colours.

Owing to the severe weather conditions the planned Open Days at Graphicus this weekend were cancelled. Instead there was a series of posts on the Graphicus Blog with competitions, a crossword, special deals & some free downloads which people were asked to use should they wish to enter one of the competitions.  Somehow the homework pieces & these free downloads matched themselves up.

Polymer Clay
Stamp: Elusive Images
Image stamped into clay & coloured with Perfect Pearls (Interference Blue & Violet) prior to baking

close-up to show the sparkle of the glitter & Perfect Pearls
I made a Christmas ornament from my stamped clay: inking the punched cardstock edges (Brilliance Pearlescent Sky Blue & Pearlescent Purple), glittering (Ice Stickles Grape Ice) & adding a length of ribbon. The back is another punched & inked piece of pale blue cardstock (thus sandwiching the ribbon) left plain for writing a personal message to make it equally suitable as a gift tag for someone special.
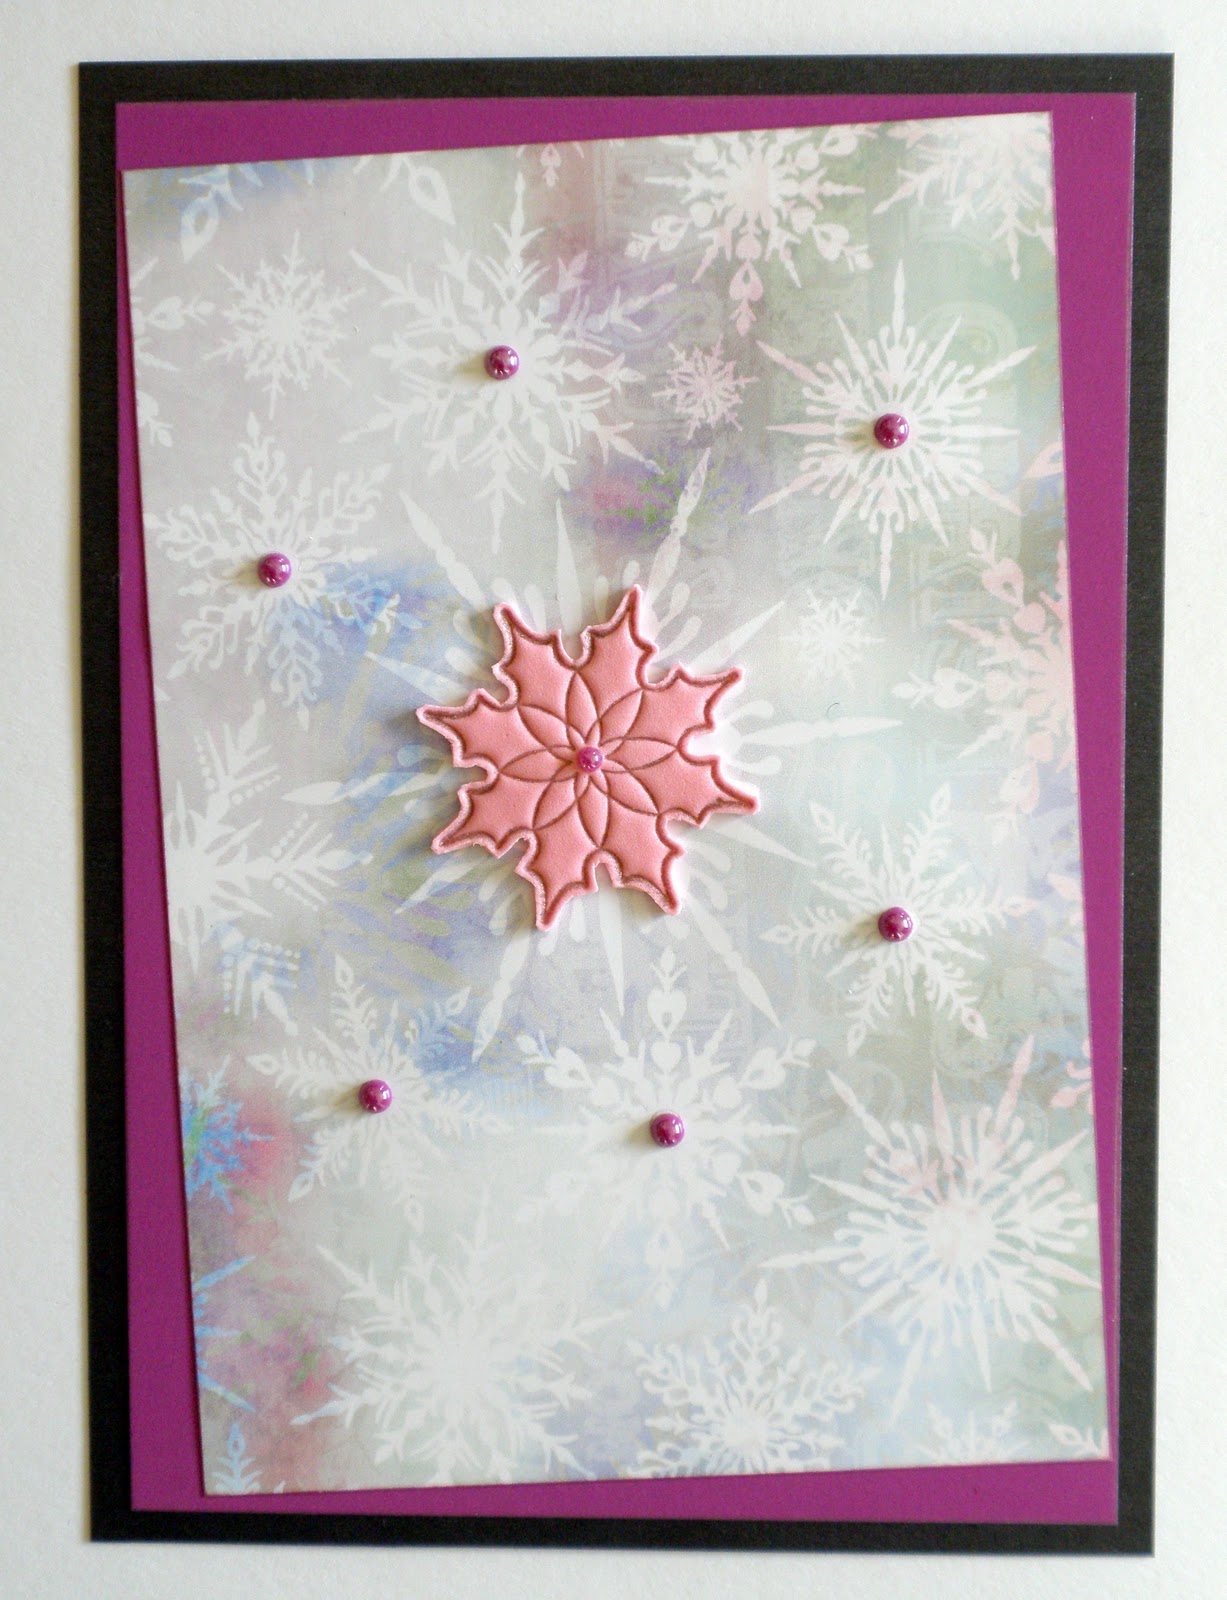

Funky Foam
Stamp: Elusive Images
Ink: Brilliance Starlite Black (image), Brilliance Pearlescent Purple (paper & cardstock edges)
Image stamped into heated foam, layered onto free backing paper plus cardstock & embellished with pearls


UTEE
Stamp: Creative Expressions
Inks: Dusty Concord Distress Ink (Stampbord), Pastel Kaleidacolor (random brayered background), 
Brilliance Pearlescent Purple (paper & cardstock edges)
Stampbord inked & coated with clear UTEE into which image was stamped & the sides coloured (Sakura Stardust Pen); mounted onto randomly brayered background, cardstock & free backing paper; embellished with pearls

close-up highlighting heart motif on Stampbord 
& patterned paper
This came together when I spotted how the heart motif found in the stamped image is echoed in one of the snowflakes (which I embellished with a pearl).


Shrink Plastic
Stamp: Elusive Images
Embossing Powder: Stampendous Twilight
Heated shrink plastic stamped into, cooled & layered onto stamped heat embossed cardstock, matching the pattern of the texture in the stamped shrink plastic to the heat embossed image

close-up showing texture of shrink plastic
 matched with embossed pattern

Stamp: Crafty Individuals
Inks: Brilliance  Pearlescent Olive (stamping), Brilliance Pearlescent Purple (paper & cardstock edges)
Heated shrink plastic stamped into, cooled & layered onto free backing paper designed by Lesley plus stamped cardstock
This is the only one of the samples where I used the technique that I learned in the course to create a piece of artwork inspired by one of the motifs in the  backing paper – in this case stamping the crackle motif to make a piece of textured shrink plastic with which to embellish & coordinating stamped cardstock for matting onto.

Friday, 3 December 2010

My Creative Classroom - Terriffic Techniques Wk 4

Week 4 was all about alchemy & using household items e.g. bleach, lemon juice, cling film etc... I did get very messy with the shaving foam, I even turned the bath water an aqua colour (!), so it was just as well I had had that before skinning my husband's smoked mackerel for dinner. There are, however, some suspiciously green stains on the tea towels after the evening's drying up.

(click on images to enlarge)

Bleach & Colour
Stamp: Elusive Images
Image heat embossed in gold, selected areas bleached & some coloured 
using  Daler-Rowney Artists’ Watercolour Pencils

Stamp: Elusive Images
Inks: Distress Inks (Dried Marigold, Mustard Seed, Peeled Paint)
Image heat embossed in silver, selected areas bleached & coloured using Distress Inks


Colour then Bleach 
Stamp: Elusive Images
Inks: Distress Inks (Broken China, Tumbled Glass, Weathered Wood), VersaFine (Onyx Black)
Background inked, image stamped & selected areas bleached 

Stamp: Elusive Images
Inks: Distress Inks (Dried Marigold,  Mustard Seed, Wild Honey), VersaFine (Onyx Black)
Background inked, image stamped & selected areas bleached with some coloured using Distress Inks


Lemon Juice Project
see HERE for details


Shaving Foam Background
Stamp: Elusive Images
Inks: Assorted Fountain Pen Inks
Text heat embossed using PearLustre Alexandrite Embossing Powder


Cling Film Background
Stamp: Hobby Art
Inks etc... Distress Inks (Aged Mahogany, Barn Door, Fired Brick), Perfect Pearls (Interference Red)
Image heat embossed in silver & coloured with Sakura Stardust Pens & Stickles Glitter Glue 

Monday, 29 November 2010

My Creative Classroom - Terriffic Techniques Wk 3

The subject for the third week of techniques was Stampbord - I worked with the domino sized pieces I had so adapted the exercises to suit.

The first example can be used to make a Christmas Badge (in which case it needs a pin attaching to the back) or as a sentiment on a card or tag. I did not have a sufficient number of tiny gems for the berries so improvised by using a combination of Glossy Accents & Stickles Glitter Glue. The edges were sanded & then the sides coloured with a Sakura Stardust Pen (the dimension of the berries & sparkle of the sides becomes more apparent by clicking the photo to enlarge).

Stamp: Hobby Art
Inks: Distress Inks (Chipped Sapphire, Tumbled Glass), Memento (Tuxedo Black)
Colouring: Copics, Stickles Glitter Glue (Xmas Red), Sakura Stardust Pen


With the second example I have used the scratcing tool to etch away the areas inside the wings of the stamped image. This time I went round the edges & the sides with a Sakura Stardust Pen.

Stamp: Elusive Images
Inks: Distress Inks (Crushed Olive, Forest Moss, Peeled Paint), Memento (Tuxedo Black)  

angled view showing edging & sides coloured with Sakura Stardust Pen

Thursday, 25 November 2010

Terrific Techniques Wk 2 Masquerades as a Waltzing Mouse Sketch

I had actually decided that I didn’t have time to make a card for the Waltzing Mouse Sketch Challenge as I still have three weeks of the My Creative Classroom exercises to complete before next Thursday (when the lessons are no longer "live"). However, I've been experimenting with my new Tim Holtz Mask which arrived yesterday &, as I was embellishing & mounting my completed exercises, I remembered a piece of lime green spotted ribbon & the Waltzing Mouse Sketch. So..... I thought a little….. & a few hours later…. after fiddling a little (with a few punches, the Cuttlebug, ribbon, pearls, inks...... OK I admit after quite a bit of fiddling, including rotating the sketch 90 degrees clockwise & thinking my way around embossing the cardstock so as to cover an area larger than would fit through the Cuttlebug in one go).

front of card

close-up of masked panel showing script stamping

close-up showing dry embossing &
 pearl embellishment

inside of card showing paper piercing
of scalloped rectangle
(click on image to enlarge)


Recipe
Stamp Crafty Individuals CI-017 (script).
Inks etc… Distress Inks (Worn Lipstick & Chipped Sapphire) for masked script panel; VersaMagic (Key Lime & Pretty Petunia) for inking various cardstock edges.
Cardstock An assortment of white, lilac, pink & green in various textures & finishes from “stash”.
Punches, Dies etc… Woodware (Oval & Scalloped Oval, Scalloped Rectangle), Cuttlebug Embossing Folder (Floral Fantasy). Tim Holtz Ideology Mini Mask (Floret)
Pearls Papermania.
The ribbon & eyelet are from “stash”.

Challenge Entered
Waltzing Mouse Sketch Challenge 24 - WMSC24 (see above)


And finally my other completed exercise for the second week of Terrific Techniques

Layered Colouring Masking
Stamp: Crafty Individuals
Inks: Distress Inks (Broken China, Chipped Sapphire, Faded Jeans, Tumbled Glass)

Wednesday, 24 November 2010

My Creative Classroom - Terriffic Techniques Wk 2

The topic for the second week was "Masking & Layering". I had thought a mask was the same as a stencil but soon discovered that it is in fact the exact reverse of a stencil. In the first three examples below I have used peel off stickers (Santa's sleigh, stars, & hexagons) as masks so that I could get on with the exercises. These proved somewhat sticky despite my fingering the backs before positioning them & so I lost several backgrounds through the paper tearing.

Masking Stamped Images
Stamps: PaperArtsy
Inks: VersaFine (Onyx Black), Distress Inks (Black Soot, Chipped Sapphire)
Colouring: Faber-Castell Polychromos & Derwent Coloursoft with Sansador

Masked Background
Inks: VersaMagic (Aegean Blue, Night Sky, Sea Breeze)

Variation of Stamping with Masked Background
Stamps: Elusive Images
Inks: VersaFine (Majestic Blue), Distress Inks (Stormy Sky, Tumbled Glass, Weathered Wood)

Masked Fairy with Layered Landscape
Stamps: Elusive Images
Inks etc: VersaFine (Imperial Purple, Olympia Green, Onyx Black, Satin Red), Nick Bantock (Sapmoss Green), 
Distress Inks (Bundled Sage, Crushed Olive, Forest Moss, Peeled Paint, Pine Needles, Tumbled Glass),
Stewart Gill Ultrafine Embossing Powder for blossoms

angled photograph showing Ice Stickles Crystal Ice Glitter Glue used on wings

Layered Landscape - Late Autumn/Winter
Stamps: Elusive Images
Inks: VersaFine (Olympia Green), Distress Inks ( Bundled Sage, Crushed Olive, Forest Moss, Peeled Paint, Pine Needles, Shabby Shutters, Weathered Wood)
Colouring: Faber-Castell Polychromos with Sansador for pine cones


Friday, 19 November 2010

My Creative Classroom - Terrific Techniques Wk 1

Click on images to enlarge

Embossed Resist
Stamp: Elusive Images
Inks: as listed

Embossed Resist project
 see HERE for details


Joseph's Coat
Stamp: Elusive Images
Inks: Kaleidacolor Pastel, Distress Ink (Chipped Sapphire)
Inked heat embossing over brayered background


Faux Batik
Stamps: Elusive Images
Inks etc: Distress Inks (Bundled Sage, Crushed Olive, Rusty Hinge, Wild Honey) for background;
 VersaFine Vinage Sepia & Stampendous Detail Black Embossing Powder for text

Stamps: Elusive Images
Inks etc: blues & violets from ColorBox PetalPoint (Pinwheel) for background;
VersaMark & Stampendous Cobalt Blue Embossing Powder for text


White Resist
Stamp: Elusive Images
Inks: as listed

White Resist Project
see HERE for details

With the tree Faux Batik exercise I had intended to stamp the text in VersaFine Vintage Sepia but it was too indistinct so whilst the ink was still wet I quickly sprinkled it with Detail Black Embossing Powder & heat embossed it. Had the text not been a requirement of this exercise I would not have chosen to stamp the text over the tree. Personally this is what I am finding so useful about a structured course - I am doing things that I would otherwise not try & learning to think round problems as I become more familiar with both techniques & materials.